What is an accidental tangency?
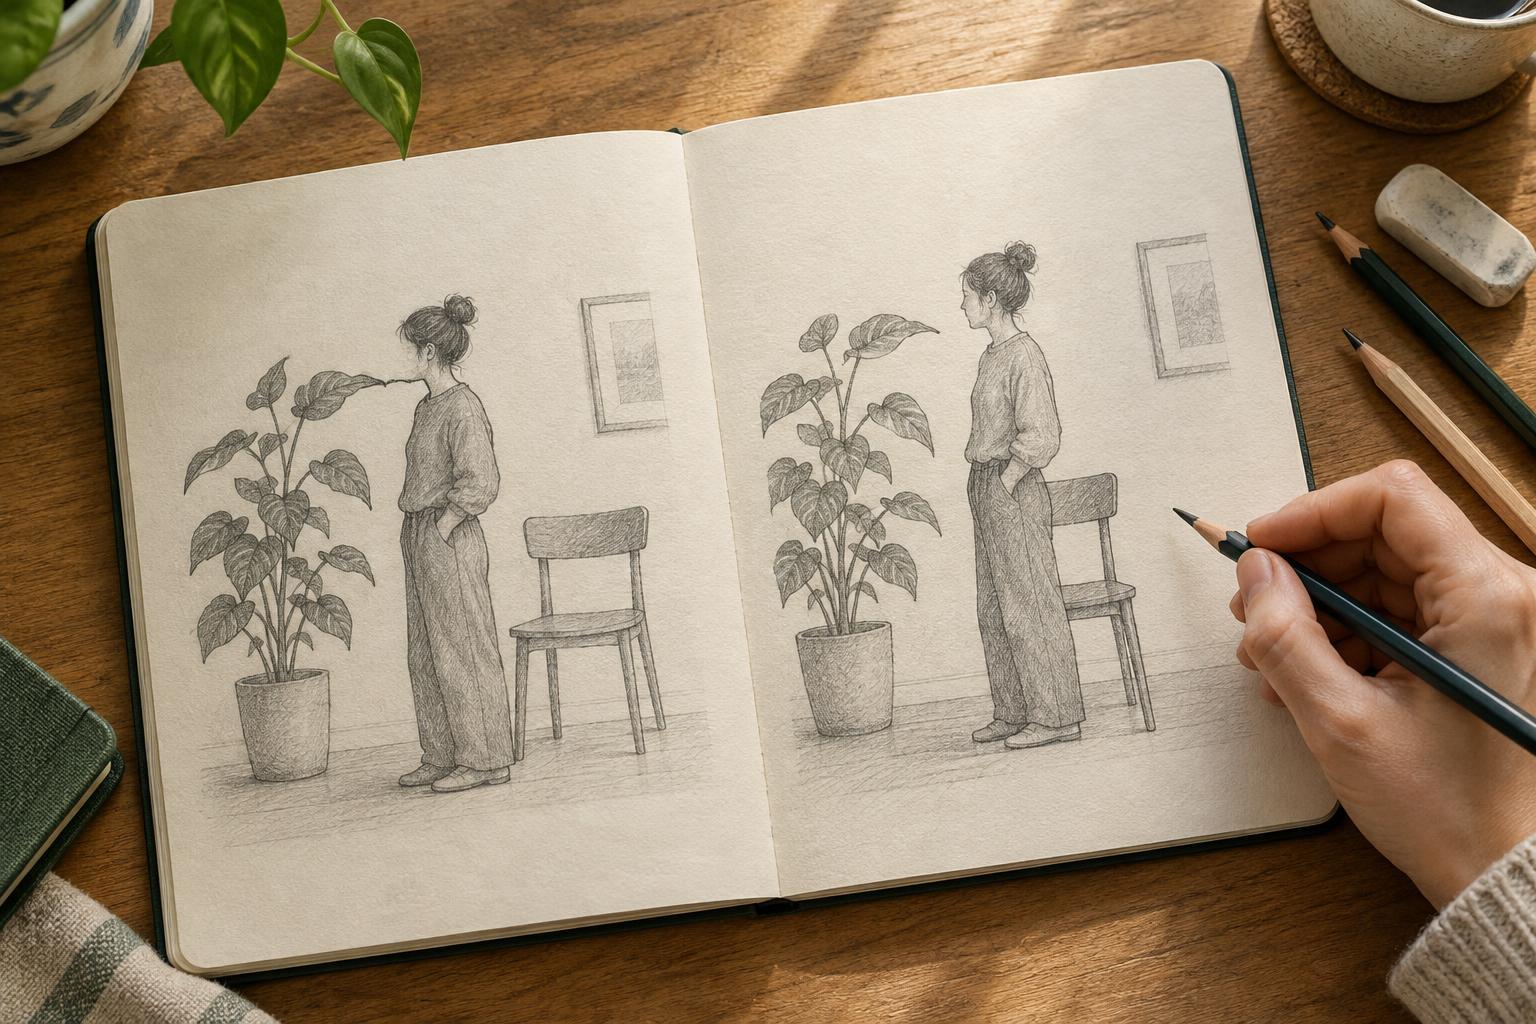
A tangency happens when two edges meet or nearly meet in a way that makes their relationship unclear. Imagine a character’s elbow ending exactly at the edge of a table. Is the arm resting on the table, passing in front of it, or simply lined up with it by chance? The viewer may pause to work that out, even if the rest of the drawing is easy to understand.
Tangencies are not automatically mistakes. A carefully aligned edge can create a deliberate visual connection. The problem is the accidental kind: a contact that suggests a relationship you did not mean. These moments are especially noticeable at the outline of a subject, where the viewer looks for clues about shape, depth, and gesture. Learning to spot them is less about following a rigid rule than about asking whether each meeting of edges helps the drawing read.
Look for the places where edges compete
Start with the silhouette. Squint at the drawing or view it as a small thumbnail, then trace the outside edge of the main subject with your eyes. Notice where a background line seems to continue a figure’s outline, where two objects barely kiss, or where a narrow gap almost closes. A plant stem lining up with a character’s leg might make both shapes look like one odd limb.
Next, inspect important internal edges: fingers against a face, clothing against a body, or a prop held close to a torso. In a comic panel, check the panel border too. A speech balloon tail that grazes a head, or a character’s foot that just touches the frame, may create a distracting point of contact.
Give extra attention to the focal point. A minor tangency in a quiet corner may not matter, while one near a hand, facial expression, or key action can interrupt the story. The useful question is not “Are any lines touching?” but “Can I tell, at a glance, what belongs in front and what each shape is doing?”
Choose separation or a clear overlap
Most accidental tangencies have two straightforward fixes. The first is separation: move one edge far enough away to make a visible gap. If a tree branch almost touches a character’s hat, shift the branch, adjust the hat, or change the crop. Check the result at the size where the drawing will be viewed; a gap that looks generous while zoomed in may disappear in a small image.
The second fix is overlap. Let one shape pass decisively in front of the other instead of allowing their edges to meet at a single point. If a hand is holding a mug, showing fingers crossing the mug’s contour can make the grip clearer than positioning the fingertips exactly along its rim. A clear overlap also provides a useful depth cue: the interrupted contour belongs to the shape behind.
Neither solution has to be dramatic. A small change in pose, angle, or placement may be enough. After adjusting, step back and check that the fix has not created a new tangency elsewhere or weakened the composition.
Revise for meaning, not just neatness
Some contacts reveal a larger drawing problem. If a figure blends into its surroundings at several points, moving individual lines may only produce a patchwork solution. Try shifting the figure against a simpler area of the background, changing the camera angle, or giving the pose a stronger silhouette. In a crowded scene, decide which shapes need to be distinct and which can comfortably merge.
Value and line weight can help, but they cannot always rescue ambiguous geometry. Darkening an edge may make it more visible without explaining whether two forms touch or overlap. Establish the spatial relationship first; then use tone or line emphasis to support it. Similarly, do not remove every contact simply to make the page tidy. A shoulder pressed against a wall or a hand placed on a shoulder may need contact to communicate the action. Make that contact specific enough to read as intended.
Build a quick tangency check into your routine
Before finishing a drawing, make a separate pass devoted to edge relationships. Flip the image horizontally, reduce it to thumbnail size, or look at it after a short break. Each change can make familiar lines feel less automatic. Mark any spot where you hesitate to name the shapes or explain which one is in front. Then test a gap and an overlap in small sketches before committing to either.
For practice, draw three simple objects in a shallow scene. Arrange them once so their edges barely touch, once with clear spaces, and once with clear overlaps. Compare how quickly each arrangement communicates depth. Repeat with a figure and a background element, keeping the pose the same while moving only the background. This exercise trains a useful habit: treating the empty space around a subject as something you draw and edit, not as whatever happens to remain.